How to vinyl wrap motorcycles, fuel tanks and fairings
DIY ‘Do It Yourself’ – for the Bike
The Complete Guide to Wrapping

I would encourage everyone to give it a go, and I hope the below helps arm you with all the information you need on how to vinyl wrap your motorcycle or car successfully. For more information on the pros, cons and tips for wrapping please see my Complete Guide to Vinyl Wrapping article.
Please hit follow on Instagram @thegirlonabike and Facebook
Tools Needed
- 3M wrap [don’t buy a cheaper alternative]
- 3M primer [for complex areas]
- Lint-free cloth
- Isopropyl alcohol
- Felt pad [or soft flat edged item roughly credit card sized]
- Stanley knife blade
- Heat gun or decent hair dryer
- Large picture frame [for wrapping tanks]
I recommend Motos.pl for buying wrap. It’s a great fast service and the cheapest sources of original 3m vinyl wrap.
Why only 3m?
From my experience, 3M is the leader in the high-performance film. As a product developed with 3M’s vast experience; it’s really like the Ferrari of wraps. No other product comes near.
- It comes ready to use right out of the box as a self-adhesive vinyl
- It handles easily, with a perfect balance between flex and rigidity
- It’s semi-permeable allowing to escape, preventing and eliminating bubbles
- It is a pressure-activated adhesive, which enables you to apply and reposition until you have the perfect finish.
Yes, there are cheaper competitor brands out there, but ultimately, wrapping is a tricky game so why make it harder with inferior materials. Buy the best and make life easier for yourself.

The Recipe
- Pick your wrap

The world is pretty much your oyster here, these wraps come in literally all colours and patterns, whether it’s a matte look, gloss or even carbon fibre effect you’re after. If you can imagine it, you can probably find it. I’d recommend taking a look at the colours available on the 3M website to select your finish and colour.
You can then buy it on eBay, Amazon or search Google to look for the cheapest source. As long as you’re careful to ensure its genuine 3M branded wrap, you can go for the cheapest outlet.
I always go for 3M 1080 wrap vinyl series
- Dismantle and clean
With a motorcycle [or car] you need to ensure you give yourself the easiest surface possible to wrap. I’d, therefore, recommend removing any panels you can so you can twist, turn and work around the part while wrapping. This includes tanks, fairings, battery covers, fenders etc.
Once apart, it’s time to clean. This is vital as any dirt, dust or oil will impede the vinyl’s ability to stick. I recommend a hot soapy wash to clean the worst; Fairy Liquid can be a good one for busting grease. Make sure you allow it plenty of time to fully dry!
You then want to use isopropyl alcohol to ensure the surface is 100% clean and grease free. For this make sure you use a lint free cloth to leave a pristine surface.
Also, while the wrap does cover your paintwork up, it does show things through as it will follow all contours. My general rule – if you can feel it, it will likely show up. Therefore, if you have any scratches, dents or rust, you will want to treat them first to ensure a smooth surface.
Once clean, be careful to keep your grubby fingers off the surface.
Cleaning needs:
- Remove parts from bike
- Give a hot soapy wash
- Treat any dents, rust and contours
- Use lint free cloth and isopropyl alcohol
- Prepare your working area
You want to be in an area with decent lighting and minimal air flow as wind could catch your wrap and cause creases, and also blow dust into the air sticking to the adhesive. I’ve heard a lot of professionals say you can’t wrap outside, I personally disagree. I’ve wrapped my Mercedes-Benz Viano twice [4 years apart] outside and both times saw a perfect finish. You want it to be dry, dust and wind free but I say outside is okay if it’s a mid-range temperature. <insert Mercedes shot>
Having said that, and given that removable motorcycle parts are mostly small in size; I would recommend doing the bike inside. My ideal is on a table where you’re able to move around the table instead of having to spin the object, such as a tank constantly.
Depending on your work surface you might want to put some protection down to both protect your table from sharp corners of the fender and also protect the paintwork from the hard surface. I just used some soft packaging – make sure it won’t leave bits on your wrap.
Finally, think about items you can use to support the item being wrapped while wrapping. A friend is the easiest option but if you’re wrapping solo anything from a large cooking bowl to support a fender can be a great aid leaving you with two hands to manipulate the wrap.
Area specs:
- Decent lighting
- Minimal air flow
- Dust free environment
- Surface / table you can move around
- Something to prop the item on
- Within reach of electrics for heat gun
You’re now ready to get wrapping!
- Wrapping
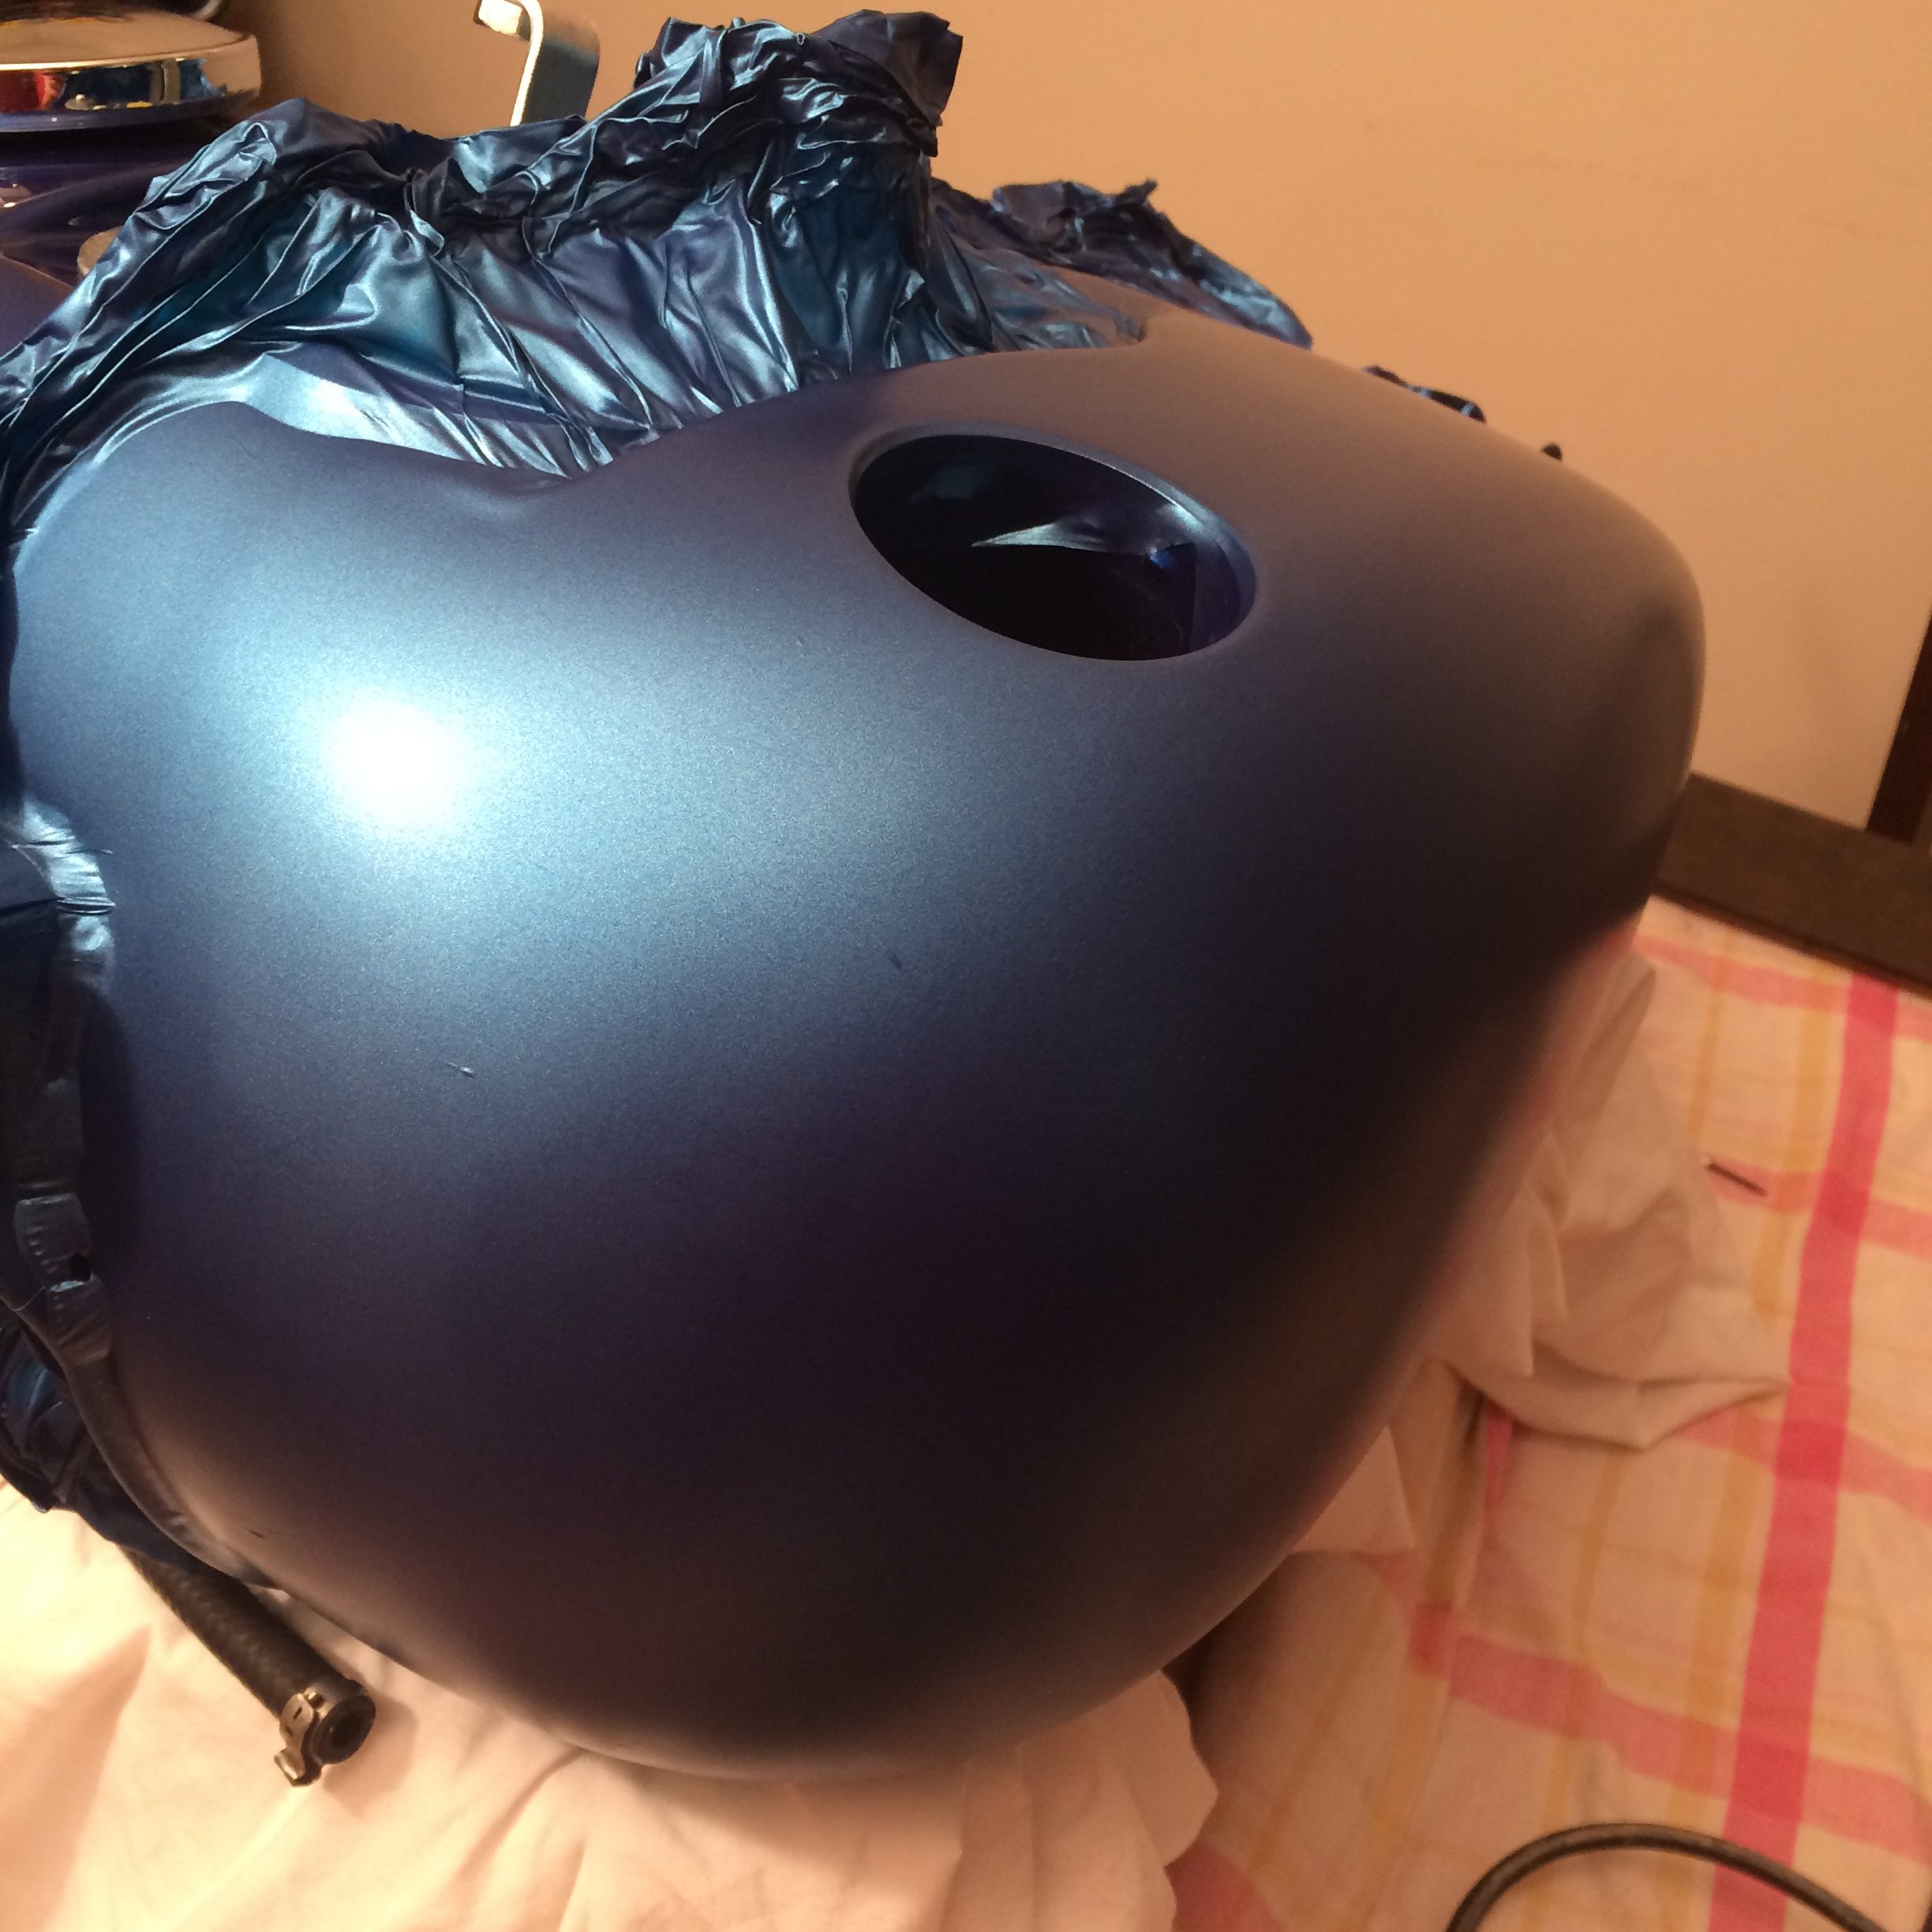
Start by roughly cutting a section of wrap slightly larger than the item being wrapped. Always go larger than the area being wrapped to allow a safety net and to give an area to touch when applying and manipulating on it. Give the surface a final check to make sure it’s clean.
Remove the backing and apply the vinyl to the flattest part of the panel first to create a baseline. You’re then going to use your felt pad to work the wrap ongoing from side to side slowly. At this stage, you want to keep the vinyl as level as possible.
Once, you’ve done the easier flat areas you should stretch the vinyl without heat over the whole area. Don’t be tempted to work the film into the more complicated areas yet; this will come gradually.
Once the wrap is where you want it, you need to apply firm pressure with your felt pad as it’s a pressure-activated adhesive. You’ll do this gradually as you go.
- Heat manipulation
Once you’ve worked in the wrap to a basic level, you’re going to need to start using some heat. The beauty of 3M wrap is its ability to stretch to up to 40 percent so it can be molded around curves and edges.
Here’s the magic, heat allows it to stretch but then heat also allows it to shrink back to its original form due to thermal material memory! It’s truly witchcraft! Whatever it is, it’s exactly what you need for wrapping something as tricky as a motorcycle as I can guarantee you won’t stretch it perfectly first time. It means you can heat stretch, apply pressure, remove, heat shrink, heat stretch, and apply… over and over. It’s an incredibly forgiving material.
When stretching the vinyl be careful to always pull outwards from the already applied area using a large section to spread the tension. This is to ensure a nice even stretch. This also applies when you use extra heat to soften and stretch the vinyl, apply heat to a larger area than you need as this should help to avoid you distorting the material.
You’ll find that you won’t get the required stretch in one, you’ll likely need to stretch and apply a small section, and then heat shrinks it, before then stretching again for the next small section. You do want to be careful not to demand too much stretch and shrink from the material, but you’ll find it exciting to do this multiple times. Plus, because modern adhesive reaches its most sticky state after 24 hours, it makes the wrap repositionable over and over [within limits].
The Frame Trick
A tip for wrapping a fuel tank is to use a large picture frame. Here you will stick the edge of the wrap to the frame, so it’s held flat across the frame. You can then have one person holding the frame while the other heats up the whole wrap surface. Once warm and supple, you can apply even tension to the full parameter of the frame and work the wrap down onto the tank. This will only work for the first section, but it massively helps you get started without too much crumpling around the edges.


Heating and shrinking:
- Heating the wrap will allow a material stretch up to 40 percent before distorting
- Heating also allows the wrap to shrink back to its original form via material memory
- If you crease or crumple the wrap, simply pull it apart, and heat will see it return to its original form
- Heat with a hot hair dryer or gentle heat gun–if it burns your fingers it will burn your wrap – turn the temperature down or move further away
- Eliminating bubbles and creases
If you find out you have a bubble or crease, don’t panic. As long as you’ve not applied pressure to the pressure-activated adhesive, you’ll be able to pull the wrap and apply a little heat to shrink the surface back to its former state and try again. If you’ve applied pressure, you can sometimes gently pull the wrap back but be careful, if you’re pulling and it’s proving difficult you might just have to accept a small crease. The tip here is; don’t apply pressure on a crease.
Bubbles are easier to deal with if you can’t pull back. The first option is to give it five minutes; the air permeable properties might allow it to dissipate out with time. If this doesn’t work, use a pin or knife point to make a small puncture, then apply a little heat and push the air out.
Elimination
- Pull back the wrap and try again, using heat to return wrap to original from
- Pin prick bubbles and gently heat while pushing the air out
- Wrap around the edge / underside
Once you’ve fully wrapped the visible surface, you want to tidy off the underside. Always try to wrap around into the non-visible area, for example, the underside of the fender. With these areas, it’s important you get a nice stick, but it really doesn’t matter how rough it looks as no one can see it.
I recommend using a 3M primer to give the wrap little extra support in sticking. Simply using a small brush to apply it around the edge and give it around 90 seconds to cure before continuing.
Use heat to ensure the wrap is nice and supple and then gently pull the wrap around the underside in sections.
- Trim edges
At this point, things should be starting to look pretty awesome. It’s time to get a very sharp knife to trim. I prefer to use a Stanley knife blade as it’s really small and easy to use around the contours. I recommend leaving a minimum of 15mm overlap around the underside.
If there is no underside, such as on a fairing, simply cut along the edge line of the item.
Be careful not to scratch your bike when cutting, I always try to cut away from the surface and then push the final bit of wrap down smooth.
- Heat seal
Finally, you need to overwrite the wraps memory of being flat and un-stretched. Here you want to heat to 80-90ºC. I tend to crank my heat gun up high and play it by guesswork, but if you’ve got the gadget, you can use an infra-red temperature gauge to be sure that you have reached this temperature. I’ve not had problems without it, but I’m sure a professional would tell you otherwise.
Make sure you get both the wrap and substrate temperature gradually as anything less will see the vinyl retain its memory resulting in it popping out of recesses and curves – maybe not immediately but in time. It’s vital this is carefully done on all stretched areas and recesses but be careful not to overheat as that will damage the wrap.
- Step back and enjoy your new look
Bonus: How to removing 3m vinyl wrap
Should you wish to remove the wrap, simply apply a little heat and gently pull the wrap away. It’s an easy job but take it steady. Once off you’ll need to use an adhesive cleaner or alcohol to clean off the remaining glue.
Time Required
How long is a piece of string? This will really come down to experience. My first tank on the Street Bob took 5.5 hours but it’s probably one of the hardest tank shapes to do due to its fish tank shape – it was also the first tank I’ve done. The Forty-Eight Sportster only took 3 hours in comparison. A fender would be about 45 minutes while a battery covers 30.
I recommend making sure you start at a time when you know you have a decent chunk of time [including light] so not to rush or feel pressured. I would also recommend not trying to do it all in one sitting as it is mentally rather tiring.
Ease of Completion
Honest answer. It’s tricky. It takes patience and a steady hand. But! It is achievable even without being a professional. The pros will tell you it’s not a home job, but I’m proof it can be.
Crowd Reaction
Mega! The bragging right of being able to say you wrapped it yourself is awesome. If you pick the right colour, the light will pop like no paintwork and draw attention. Wrapping, and the ability to simply change colour when you fancy it means you can trick people with your new ride [which is simply a new wrap].
People are genuinely fascinated by the wrap finish.
£££
For a motorcycle like a Sportster or DYNA if you buy 3 metres x 1.5 metres of wrap you’ll have more than enough [just in case you have to restart a piece]. Alcohol will be a few quid, along with a foam pad. As you’re doing it yourself, it’s a labour of love, so time is all it’ll cost.
I estimate wrapping your bike to cost about £120 / €150 / $170
Highlights
- New look for a fraction of the cost
- Satisfaction of doing it yourself
- Totally achievable as an amateur
Tips From Experience
- Have a friend help, 4 hands make it a lot easier than 2
- Start with an easier item with the least amount of contour, leave the tank to last!
- Avoid wrapping in cold weather
- Leave plenty of time – don’t try and do it in a rush
- Don’t start if you’re tired, you need patience and energy
- Have some snacks and a kettle for tea/coffee nearby to keep you fuelled
- If the heat gun burns your fingers it will burn the wrap
- Be prepared to write off some wrap and start again if it goes wrong
Overall Rating
Wrapping gives your ride a totally new looks for a fraction of the cost and also protects your paintwork. It does take time and patience, but it’s so worth it for the finish and bragging rights.
https://www.instagram.com/p/BHQSY47gSZE/?taken-by=thegirlonabike
https://www.instagram.com/p/BGYjgh1qdTh/?taken-by=thegirlonabike
Remember, I’m an account director in marketing…not a mechanic or engineer…so if
I can do it. You can do it!
Give it a go and give me a shout if you have any questions.
If you’re new to my page – it’s more than just dirt bike riding and racing, I’m on a mission to prove that nothing is impossible if you want it bad enough. See more about my story plus read about my life changing accident, which started it all.
You can find me Vanessa, The Girl On A Bike over on Instagram, Facebook and YouTube, and www.thegirlonabike.com.
Latest Content

#BecauseICan School Speech Day Speaker
#BecauseICan School Speech Day Speaker with Vanessa Ruck aka The Girl On A Bike Vanessa Ruck is a TEDx & ...

Vanessa Ruck’s Pregnancy Journey: The Realities of Riding and Motherhood
Vanessa Ruck’s Pregnancy Journey: The Realities of Riding and Motherhood As a passionate motorcycle rider and athlete, Vanessa Ruck’s journey ...

Yamaha AG100 Review: The Most Robust Motorcycle on the Market?
Yamaha AG100 Review: The Most Robust Motorcycle on the Market? Could the Yamaha AG100 two-stroke be the ultimate robust, low-maintenance ...
